机器视觉运动控制系列1:face_recognition研究笔记

  几个月前,boss想要做的一个项目中有这样一系列的需求,使用摄像头捕获特定的人脸目标,然后控制机械臂追随目标移动并定时拍下照片,这一机器视觉运动控制系列是整理当时部分代码的重现。为了快速的实现这一目标的原型我首先寻找了一下人脸识别的实现方式,对face_recognition做了较多研究,本文是这一部分工作的记录。

  face_recognition是非常流行的一个人脸识别项目,repo在这里:
ageitgeygithub.com/ageitgey/face_recognition

  当时小项目的第一步是想要在摄像头中识别出人脸,比较了几个库后face_recognition的介绍比较贴切也好实现,就对他研究比较多。昨天重新搭环境莫名的不顺利,所以也记下过程备查。face_recognition依赖dlib,直接下载dlib提示需要cmake,而cmake又需要vs,装了vs2017
conmunity,确定支持cmake编译时突然回忆起自己之前不是这么麻烦搞的吧,才想起时pypi上的dlib。。。得嘞这也省事,所以直接pypi上下载然后install搞定,之后pip安装face_recognition,opencv-python,部署完成。

  配置好了环境之后按照face_recognition的example,先跑一下benchmark看一下机器的能力:

1
2
3
4
5
6
7
8
9
10
11
12
13
14
15
16
17
18
All benchmarks are only using a single CPU core
Timings at 240p:
- Face locations: 0.0839s (11.91 fps)
- Face landmarks: 0.0040s (248.42 fps)
- Encode face (inc. landmarks): 0.0392s (25.51 fps)
- End-to-end: 0.1322s (7.56 fps)

Timings at 480p:
- Face locations: 0.3263s (3.06 fps)
- Face landmarks: 0.0041s (246.16 fps)
- Encode face (inc. landmarks): 0.0337s (29.68 fps)
- End-to-end: 0.4032s (2.48 fps)

Timings at 720p:
- Face locations: 0.7467s (1.34 fps)
- Face landmarks: 0.0041s (246.80 fps)
- Encode face (inc. landmarks): 0.0353s (28.33 fps)
- End-to-end: 0.8286s (1.21 fps)

  可以看到Face locations随着图片分辨率的提高效率明显下降,而对应的Face landmarks
几乎没有什么影响,这也是我一直想还是研究使用特征来追踪的原因,靠调Face locations来实时定位的效果太差了。

  下面记录一些当时和example不太一样的实现:

1
2
3
4
5
6
7
8
9
10
11
12
13
14
15
16
17
18
19
20
21
22
23
24
25
26
27
28
29
30
31
32
33
34
35
36
37
38
39
40
41
42
43
44
45
46
47
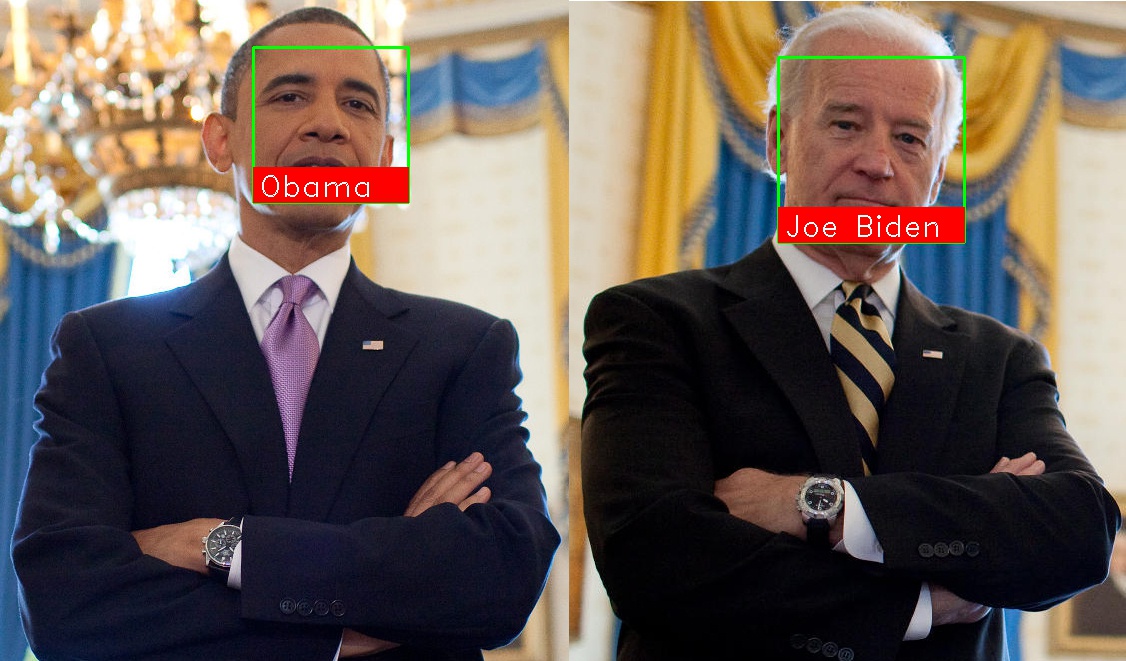
# 在一张图片里找多个人的人脸,之前测试时发现识别率有待提高,存在较多的误认;
# 参考了identify_and_draw_boxes_on_faces.py
# face_recognition可以计算两张照片的相似度,见example/face_distance.py
import face_recognition
import cv2

# 在这张frame里的识别人脸
frame = cv2.imread("two_people.jpg")

# 识别哪些人脸,每人给一张就可以了
obama_image = face_recognition.load_image_file("obama.jpg")
obama_face_encoding = face_recognition.face_encodings(obama_image)[0]
biden_image = face_recognition.load_image_file("biden.jpg")
biden_face_encoding = face_recognition.face_encodings(biden_image)[0]
known_face_encodings = [
obama_face_encoding,
biden_face_encoding]
known_face_names = [
"Obama",
"Joe Biden"]

# 找到frame中的所有人脸
face_locations = face_recognition.face_locations(frame)
face_encodings = face_recognition.face_encodings(frame, face_locations)
print("I found {} face(s) in this photograph.".format(len(face_locations)))

# 在找到的人脸旁边做标注
for (top, right, bottom, left), face_encoding in zip(face_locations, face_encodings):
matches = face_recognition.compare_faces(known_face_encodings, face_encoding)
name = "Unknown"
# 画个框把脸框起来
cv2.rectangle(frame, (left, top), (right, bottom), (0, 255, 0), 2)

# 把人名读出来,这里如果排在靠后位置的是个大众脸,那误识可就高了
for i in range(len(known_face_names)):
if matches[i]:
name = known_face_names[i]
else:
pass

# 画个标签框里面写上找到的人的名字
cv2.rectangle(frame, (left, bottom - 35), (right, bottom), (0, 0, 255), cv2.FILLED)
font = cv2.FONT_HERSHEY_DUPLEX
cv2.putText(frame, name, (left + 6, bottom - 6), font, 1.0, (255, 255, 255), 1)

# 输出
cv2.imwrite("find.jpg", frame)

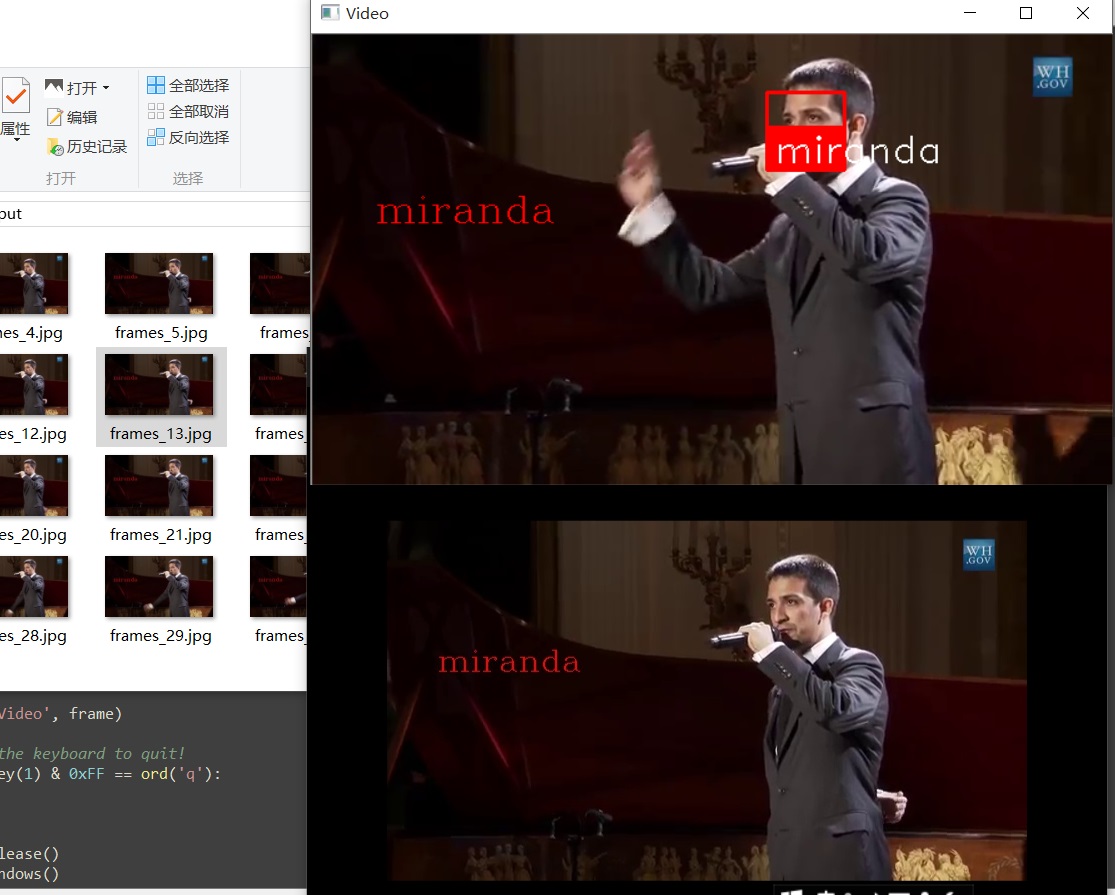
  下来看如何从一个视频里找到目标的人脸:

1
2
3
4
5
6
7
8
9
10
11
12
13
14
15
16
17
18
19
20
21
22
23
24
25
26
27
28
29
30
31
32
33
34
35
36
37
38
39
40
41
42
43
44
45
46
47
48
49
50
51
52
53
54
55
56
57
58
# 从视频中找到人脸,可以参考example/facerec_from_video_file.py,它是整体输出到output.avi里。
# 这里我实时播放出来,并把截图保存下来
import face_recognition
import cv2

# 在这个视频里识别人脸
video_capture = cv2.VideoCapture("hamilton_clip.mp4")

# 找这个人脸
obama_image = face_recognition.load_image_file("lin-manuel-miranda.png")
obama_face_encoding = face_recognition.face_encodings(obama_image)[0]

# num用来为存储的截图计数命名
num = 0
while True:
# 切片得到一张截图
ret, frame = video_capture.read()

# 这个地方注意CV2颜色顺序的一个坑,他是BGR,这里转成RGB
rgb_frame = frame[:, :, ::-1]

# 找人脸
face_locations = face_recognition.face_locations(rgb_frame)
face_encodings = face_recognition.face_encodings(rgb_frame, face_locations)

# 在找到的人脸旁做标注
for (top, right, bottom, left), face_encoding in zip(face_locations, face_encodings):
match = face_recognition.compare_faces([obama_face_encoding], face_encoding)

name = "Unknown"
if match[0]:
name = "miranda"

# 在截图上打个标签,先写人名吧,表示处理过,将来可扩展处理方式
cv2.putText(frame, name, (50, 150), cv2.FONT_HERSHEY_COMPLEX, 1, (0, 0, 255), 1)
# 把截图存下来,要建一下output文件夹不然报错找不到路径
num = num + 1
filename = "output\\frames_%s.jpg" % num
cv2.imwrite(filename, frame)

# 画个框把脸框起来
cv2.rectangle(frame, (left, top), (right, bottom), (0, 0, 255), 2)

# 画个标签框里面写上找到的人的名字
cv2.rectangle(frame, (left, bottom - 35), (right, bottom), (0, 0, 255), cv2.FILLED)
font = cv2.FONT_HERSHEY_DUPLEX
cv2.putText(frame, name, (left + 6, bottom - 6), font, 1.0, (255, 255, 255), 1)

# 实时展示
cv2.imshow('Video', frame)

# Hit 'q' on the keyboard to quit!
if cv2.waitKey(1) & 0xFF == ord('q'):
break

# Release
video_capture.release()
cv2.destroyAllWindows()

  在上段代码中修改一句源就可以变成从摄像头展开识别了:

1
2
#从摄像头里识别人脸
video_capture = cv2.VideoCapture(0)

  但是使用这段代码来进行摄像头的实时识别体验比较差,笔者的电脑像看ppt一样,face_recognition也给出了一个优化的方案,思路是把视频源进行缩放,然后隔一帧做一次识别,牺牲一定的识别范围(实测缩放后可以识别的距离在一米到一米五之间,当然我想与我的摄像头性能也有关系),提高识别的效率。

1
2
3
4
5
6
7
8
9
10
11
12
13
14
15
16
17
18
19
20
21
22
23
24
25
26
27
28
29
30
31
32
33
34
35
36
37
38
39
40
41
42
43
44
45
46
47
48
49
50
51
52
53
54
55
56
57
58
59
60
61
62
63
64
65
66
67
68
69
70
71
72
73
74
75
76
#从摄像头中找到人脸,参考facerec_from_webcam_faster.py
#实时播放出来,打水印并把截图保存下来
import face_recognition
import cv2

video_capture = cv2.VideoCapture(0)

#找这些人脸
obama_image = face_recognition.load_image_file("obama.jpg")
obama_face_encoding = face_recognition.face_encodings(obama_image)[0]
lijiawei_image = face_recognition.load_image_file("lijiawei.jpg")
lijiawei_face_encoding = face_recognition.face_encodings(lijiawei_image)[0]
known_face_encodings = [
obama_face_encoding,
lijiawei_face_encoding]
known_face_names = [
"Obama",
"lijiawei"]

#num用来为存储的截图计数命名
num = 0
#process_this_frame确定这一帧是否进行识别
process_this_frame = True
while True:
#切片得到一张截图
ret, frame = video_capture.read()

#在这里把视频缩放到只有1/4*1/4,调整RGB
small_frame = cv2.resize(frame, (0, 0), fx=0.25, fy=0.25)
rgb_small_frame = small_frame[:, :, ::-1]

#隔一帧做一次识别
if process_this_frame:
face_locations = face_recognition.face_locations(rgb_small_frame)
face_encodings = face_recognition.face_encodings(rgb_small_frame, face_locations)
process_this_frame = not process_this_frame

#呈现与保存
for (top, right, bottom, left), face_encoding in zip(face_locations, face_encodings):
#将缩放还原
top *= 4
right *= 4
bottom *= 4
left *= 4

#找人名
matches = face_recognition.compare_faces(known_face_encodings, face_encoding)
name = "Unknown"
for i in range(len(known_face_names)):
if matches[i]:
name = known_face_names[i]
else:
pass

#打水印保存截图
cv2.putText(frame, "cam", (50, 100), cv2.FONT_HERSHEY_DUPLEX, 1, (0, 0, 255), 1)
num = num + 1
filename = "output/frames_%s.jpg" % num
cv2.imwrite(filename, frame)

#实时展示画个框把脸框起来,画个标签框里面写上找到的人的名字
cv2.rectangle(frame, (left, top), (right, bottom), (0, 0, 255), 2)
cv2.rectangle(frame, (left, bottom - 35), (right, bottom), (0, 0, 255), cv2.FILLED)
font = cv2.FONT_HERSHEY_DUPLEX
cv2.putText(frame, name, (left + 6, bottom - 6), font, 1.0, (255, 255, 255), 1)

#实时展示
cv2.imshow('Video', frame)

#Hit 'q' on the keyboard to quit!
if cv2.waitKey(1) & 0xFF == ord('q'):
break

#Release
video_capture.release()
cv2.destroyAllWindows()

  至此我们就有了一个可以快速实现计算机识别的人脸的方案了。包含从一个照片中找到多人;从视频中找到某人并实时打水印和保存截图,以及从摄像头中找到多人。使用face_recognition,目标只需要提供一张照片就可以了,它很简单但是精确性上自然有些牺牲,如果要识别侧脸,识别物体运动轨迹(这个小项目当时的需求是要能识别脸部运动轨迹的),使用face_recognition可能就不是很合适了,具体解决方案有待于以后有机会再研究。